Translate Widget

English French German Spain Italian Dutch

Russian Portuguese Japanese Korean Arabic Chinese Simplified


this widget by www.bloggerarticle.com

Search This Blog

Tuesday, July 19, 2011

Brisket Wellington

 After consulting with several cooks, about what they do with the leftover brisket, we came to the general consensus, that there usually isn't any left overs.  This weekend, we did a large amount of cooking and actually had a couple of strips left over.  We came up with the idea of doing a Brisket Wellington. It is a play on the ever popular Beef Wellington.  The Beef Wellington is usually made with beef tenderloin wrapped in puff pastry dough and served sliced. The name is often credited to Arthur Wellesley, the first Duke of Wellington, as being a favorite dish of his.
 We used our creative license to make our own interpretation of this famous dish.  The most obvious difference is that we used leftover brisket, instead of beef tenderloin.  We used puff pastry sheets to wrap the sliced brisket and sautéed onions. The oven was preheated to 400°.  We then use some sliced mozzarella to make the dish a little more like comfort food, instead of the classic.
 We folded one of the flaps over the filling and then took the remaining flap and folded it over the first flap and rolled in the ends, to prevent any spillage.  We made two rolls and placed them on on a cookie sheet, covered with parchment paper, to prevent any sticking.  The rolls then went into the preheated oven, for approximately 15 to 17 mins.  Once the desired color was achieved on the pastry dough, the wellingtons were removed from the oven and allow to cool, for about 5 mins.

 The wellington s were sliced into 1/2 inch slices.  You can see how moist and juicy brisket cooks.
It was really fun and interesting to do and rather easy, provided you had the brisket done.  This could be done as part of a meal or as a snack or even appetizers.  It definitely has a "wow" factor and the elegance of a classic meal.  Try this at your next gathering or party, or as a treat for your family, you definitely would not be disappointed.  Thanks for looking!

Monday, July 11, 2011

Southern Treats: Zucchini and Spinach Pie

Southern Treats: Zucchini and Spinach Pie: " After collecting our harvest of zucchinis, we had to decide what to do with them. A couple of friends mentioned to try and make zucchini br..."

Zucchini and Spinach Pie

 After collecting our harvest of zucchinis, we had to decide what to do with them. A couple of friends mentioned to try and make zucchini bread or pie. After a little research on the internet, I found a recipe for Italian or Greek style pie. I decided to make a combination of both and also add spinach to the mix.
 First, I had to shred the zucchini with the help of the food processor. I ended up with almost 8 cups of shredded zucchini.
 Two packs of frozen spinach, thawed, drained and strained with a cloth to take out as much water as possible. We also added one med. onion diced and 3 tablespoons minced garlic.  In a large non-stick skillet, we melted about 1 tablespoon of butter and then sauteed the garlic and onions till they become translucent. Then added the zucchini and spinach and cooked for about 4-5 minutes. Remove from heat and allow to cool. In a separate bowl, whisk 4 whole eggs and then add 1 cup of ricotta cheese, mix until well incorporated. Pre-heat oven to 375 degrees. Added one cup Parmesan grated cheese and 8oz. of Quesadilla cheese (or other soft melting cheese) to the egg mixture. Season with 1/4 teaspoon black peeper and 1/4 teaspoon of salt. Prepare a greased Pyrex pie dish, with Phyllo dough sheets layer to cover the dish. Use melted butter to brush on between the layers of Phyllo Dough.  Check out the video clip, for more detail on filling pie dish.
 Into the oven for 45 minutes, or golden brown crust. Allow to cool for about 5 minutes, and slice with a knife. Serve as a main dish for brunch or a side dish for dinner. Good way to get the kids to eat their vegetables. Enjoy and thanks for checking out our blog!
Video Clip

Friday, July 8, 2011

The Birth of the RIB-O-LATER!

 You have often heard the term" Christmas in July", used by retail stores to advertise really great savings.  The term does apply in this particular situation, the Rib-O-Later was my Christmas present, from my two nephews.  Due to a busy schedule and a long winter, I did not get a chance to assemble my new " Toy". I took the opportunity to get the additional rung needed, for the drum and assemble it together.
 Under the direction of a fellow BBQ-Brethren friend known as "Cowgirl",  she made the assembly process go so much quicker. Once the top portion of the spare drum was cut out, I used one of the top bands to secure it to the main drum.  As you can see in the pictures below, the band was secured using a" C" clamp. the holes were drilled approximately 7 inches from the top of the extended portion, to ensure that the lid would not interfere with the rotation of the stainless steel planks.  I was able to procure 35 inch rotisserie rod and motor from my local Lowe's home improvement store on sale, for the Fourth of July weekend.
 The whole assembly took approximately about two hours including the drilling.  In preparation for this particular groundbreaking cook, we had six racks of baby back ribs that were rubbed using John Henry's Pecan rub, for about 24 hours.  We were able to get the four racks on the planks and let them cook for approximately 4 1/2 hours.  The ribs were periodically sprayed with apple juice during the cook.
 The one thing that I really like about this Rib-O-Later is that it provides an even cook, to all the ribs, because of the rotisserie.  Having cooked several racks of ribs, on the UDS, I can honestly tell you that it has been a problem in the past.  After several trial and errors, we have become accustomed to the moving the ribs around on the grates to ensure an even cook.  This eliminates the need for the rearranging and is one less thing that you have to worry about.  This would also work great for sausages, thighs, salmon, pork and beef loins, vegetables and anything else that you could imagine.  I could also use the extension with the Rib-O-Later on my Weber kettle, when I am not smoking and need for the heat to be kicked up a notch or two.
I seriously recommend this product and you can expect to see more posts with the different uses that I will find for it.  This was definitely a great gift!  Thank you for looking!

Wednesday, June 29, 2011

Chuck Roast in the Oven

 This last weekend, the weather did not permit for outdoor cooking.  We had to resort to other means.  We started out with two boneless beef chuck roasts, that were on sale, for $1.99 a pound. The chuck roasts were rubbed with a Texas style homemade rub.  The rub consisted of granulated garlic powder, onion powder, Ancho chili powder, black pepper, cumin, kosher salt and sugar.  Each chuck roast with approximately between two and 2 1/2 pounds.  While the rub was being applied, the oven was preset to 350°. The roast would go in the oven for one hour, uncovered.
This is what the roasts look like after one hour.  The next step is to add 1 1/2 to 2 cups of the beef broth to the pan and then foil.
                                  The pan would then go back in the oven for three hours, at 300°(the temperature was reduced).
After the three hours, allow the roasts to rest for about 10 to 15 minutes.  Be very careful to uncover the foil, as there is probably still some steam.  At this point, you can either try to slice it or just pull it apart.  The meat is so tender that it will just break apart.  We have used this for tacos, wraps, served over white rice and even on pizza.  The possibilities are endless.
On this occasion, we decided to just have it a vegetable medley.  If you wanted to, you could use the pan drippings to make a delicious gravy, not that it is needed; but otherwise it would be a waste of good flavor.  This particular dish is not very time-consuming to prepare, other than the time spent in the oven.  It is definitely a crowd pleaser and with proper planning, does not make you a slave to the kitchen.  Hope you try it, soon!

Tuesday, May 31, 2011

Kicked-Up Chicken Tacos

 How often do you ever wonder, that million-dollar question," What's for dinner, tonight?"  Well, tonight was no different. We went to the supermarket, with a blank slate, and tried to decide, what would be easy and affordable to make?  After browsing through the circular, we noticed that our local Harris Teeter supermarket had boneless and skinless chicken thighs, on sale for a $1. 49, a pound. Once we had the chicken picked out, we started to quickly think, what can we make with it? Near the meat section, the supermarket conveniently placed the Grill Mates marinades, within eye view.  The buy one get one free sign, over the display, pretty much made this a no-brainer.
 We prepared the marinade, according to the specifications on the back of the envelope, we also added a touch of honey, to sweeten up the marinade.  Once the mixture was thoroughly mixed, we placed the 2 pounds of chicken thighs, in a Ziploc bag and allowed the poultry to marinade, for approximately one hour.
 The kettle was fired up, cleaned and sprayed with nonstick cooking spray, to prevent the chicken sticking to the grill.  When spraying the grill with nonstick cooking spray, I strongly advise to use the Weber brand, because it is specially made to NOT cause flareups.  When the coals were ready, the chicken was laid out on the grill, for about 5 min. on each side, and then turned, for a another 5 min.  After that, the chicken was placed directly over the coals, for about a minute to 2 min., on each side, to brown up the chicken.
 Once the chicken was done, it was removed from the grill and foiled, to allow the chicken to rest. We like to take a chicken off the grill, at approximately 165° internal temperature.  The chicken will continue to cook in what is known as "carry over cooking".  The "carry over cooking" will take it well beyond the safe temperature of 170° internal.  It helps to have a instant read thermometer, to test for proper cooking temperature.
 Here is the part, where the chicken gets kicked up a bit, instead of using the traditional salsa, to season up chicken, we decided to use Philadelphia cooking cream cheese, a Santa Fe blend.  After the chicken was thinly sliced,  we incorporated the cream cheese and blended it thoroughly, tasting and seasoning as we went along. Once the chicken mixture was done, it was time to get the taco shells  into the oven and heat them up for about 10 min.
The taco shells were filled with the chicken mixture, shredded lettuce, diced tomato and a mixture of shredded mozzarella and provolone cheese.  The chicken had an extreme flavor from the Mojito Lime marinade, the honey, the Santa Fe cream cheese and our seasoning.  The chicken was good enough to eat alone, because of the different layers of flavor that were obtained, but the tacos made it a wholesome meal, that was both delicious and very satisfying.  So, the next time you're thinking about what to make for dinner, consider this simple, but tasty treat. It can also be done with chicken breast  Hope you will enjoy it, as much as we do.  Buen Provecho!

Sunday, May 29, 2011

Brined Pork Chops on the Grill

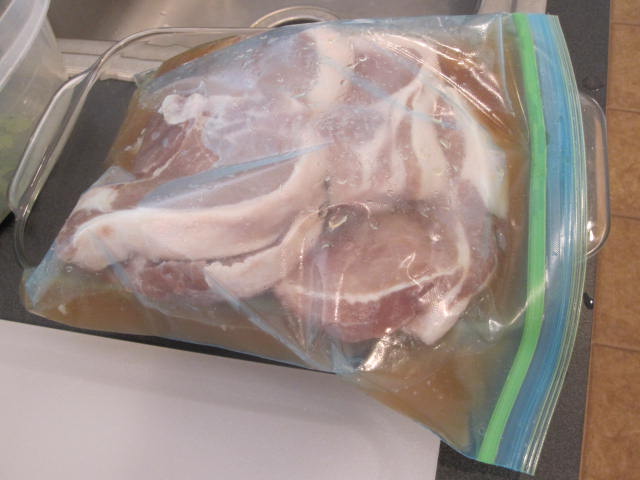
 Started out by brining six, half-inch pork chops, in a zip lock bag, for approximately 5 hours.  The brine consisted of 4 cups of water, 1/2 cup of Morton's Tender Quick cure, 1 cup brown sugar and a quarter cup of apple cider vinegar.  The purpose of the brine is to tenderize and help keep the moisture, in the meat. After the five hours, the chops were rinsed off very  thoroughly, to remove any excess saltiness. I then pat dried the chops with paper towels and placed them on the cutting board, to be seasoned.
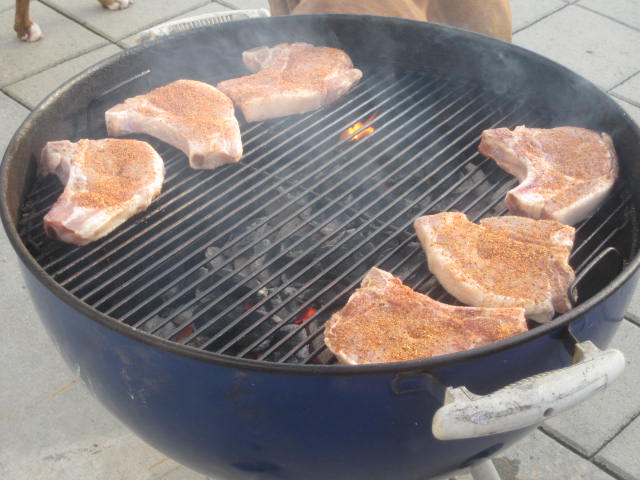
 Keeping in mind, that brine did have a lot of salt and sweetness, I take into consideration that my seasoning such have a low salt content. The seasoning consisted of California style garlic powder, onion powder, smoked Paprika and about 1 teaspoon of John Henry's Texas Chicken Tickler.  Thoroughly mixed the seasoning, to make sure to have incorporated all the spices and then applied liberally to the chops. Meanwhile, the Kingsford charcoal was lit, in the charcoal chimney, and when the coals were grey, they weared poured down the middle of the kettle, leaving the sides set up for indirect grilling.
 The kettle was sprayed with Weber grill spray, to ensure that meat would not stick to the grill.  The  meat was layered, off the fire and covered for 5 mins. intervals.  After the 5 mins., the chops were flipped, using tongs, and not a fork, because we do not want to pierce the meat and try to retain as much of the juices, as possible.
 After the next 5 mins., the jobs were placed directly over the hot coals for about a minute, on each side, to ensure nice coloring and grill marks.
 This is what they look like, once they were removed from the fire, the chops were foiled and allow to rest for about 10 mins., allowing for the juices to redistribute, within the meat.
This is the finished product, if you look closely, at the cut section, you see a slight pinkish hue on the meat, this is because of the  tenderizeration effect, of the brine. These pork chops were very tasty, flavorful and juicy; besides the brining process, they were also very quick to cook.  Hope you enjoy our latest post and hopefully you will give it a try soon.